Flambient Blending Workflow for Real Estate Photography: Camera Settings & Luminosity Mode
Mastering a repeatable flambient blending workflow real estate photography pipeline is the most reliable way for property photographers to command luxury studio rates while eliminating mixed-lighting color casts and muddy HDR shadows. At PSVN (Photo Services Vietnam), our 80+ full-time photo/video editors and QC specialists hand-blend thousands of Flash-Ambient stacks every night—combining ambient shadow depth, 5500K strobe color accuracy, and crisp pen-tool window pulls at our flat $1.20 USD (A$1.80 AUD · £0.95 GBP) Standard rate with a 12-hour overnight SLA via our real estate photo editing service. Volume based pricing available for high-volume clients.
By Khanh Tran & PSVN Post-Production QC Team
Why the Flambient Blending Workflow Real Estate Photography Standard Wins
As detailed in our HDR vs. Flambient real estate photography comparison, shooting ambient-only brackets under mixed 2700K tungsten chandeliers and 6000K window daylight creates heavy orange-and-cyan color contamination across white ceilings and oak floors. Conversely, shooting flash-only interiors produces harsh specular highlights, dark background hallways, and flat unnatural shadows.
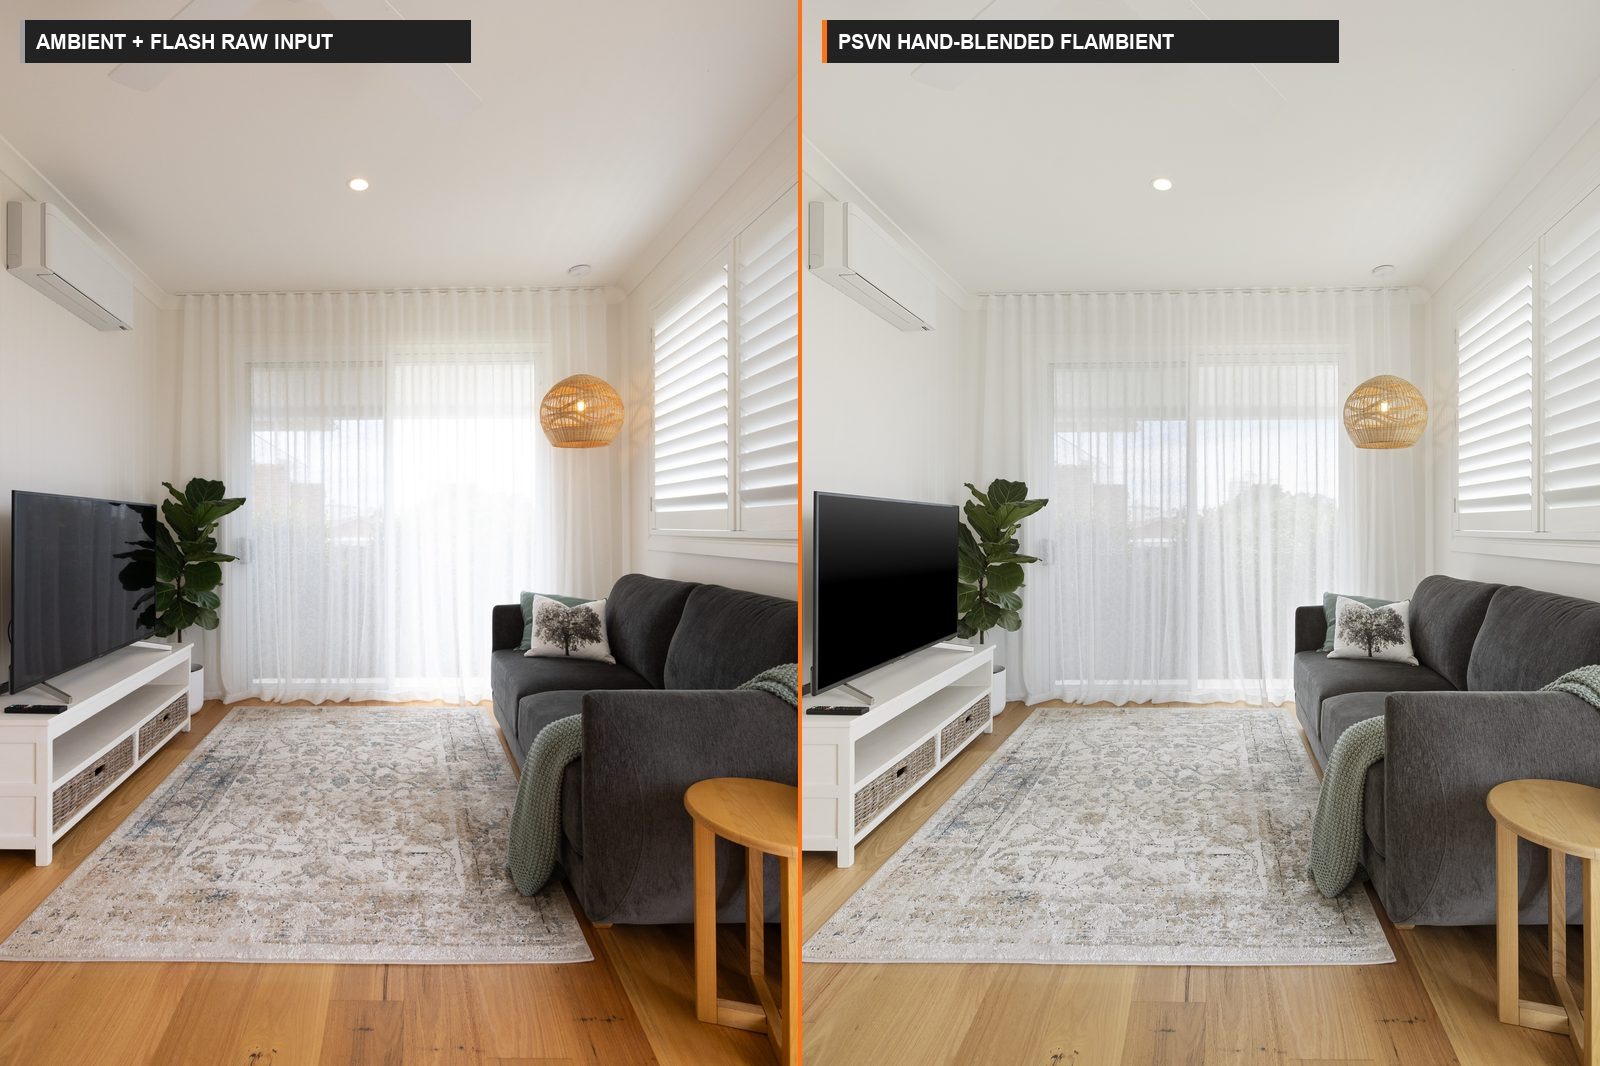
The flambient blending workflow real estate photography method solves both problems mathematically by separating luminance (natural light direction and shadow falloff) from chrominance (accurate surface color):
| Layer in the Flambient Stack | On-Site Capture Settings (f/8, ISO 100–400) | Photoshop Blend Mode & Role | What It Fixes in the Final Image |
|---|---|---|---|
| 1. Base Ambient Frame(s) | 0 EV (plus optional -2 EV / +2 EV ambient brackets), Flash OFF | Luminosity Mode (45%–65% Opacity) over Flash base | Restores natural directional window shadows and soft room-to-room depth |
| 2. Interior Flash Frame(s) | 0 EV to +0.7 EV ceiling bounce with 200Ws–600Ws strobe (5500K) | Normal Base Layer (or Color Mode over Ambient) | Neutralizes yellow 2700K lamp casts and blue skylight reflections on floors |
| 3. Window Pull Flash Pop | 1/200s – 1/250s shutter (-2.0 EV to -3.0 EV), strobe aimed at window frame | Darken Mode + Pen-Tool Path (70%–85% Opacity) | Recovers crisp exterior views and kills bright halation around white mullions |
| 4. Specular / Glare Repair Frame | Secondary flash bounce from opposite corner (for kitchen islands / hardwood) | Layer Mask Brush (25%–50% Flow) | Eliminates blown-out strobe hotspots on polished stone counters and timber floors |
Phase 1: On-Site 3-to-5 Frame Capture Protocol (Under 45 Seconds per Room)
To keep your on-site appointment under 45 minutes per property while giving your overnight editing pod clean raw layers, standardize camera settings across every shooter on your team:
- Lock Aperture, White Balance & ISO (
f/7.1 – f/8,ISO 100–400, Manual Mode): Keep aperture fixed atf/8so lens sharpness, depth of field, and focus breathing stay 100% aligned across every exposure in the stack. - Capture the Ambient Exposure(s) First (
Flash OFF): Shoot a clean0 EVambient frame exposed for interior midtones (or a quick 3-bracket±2 EVambient burst when deep adjoining hallways or walk-in closets need clean shadow detail). - Fire the Ceiling-Bounce Flash Frame (
Flash ON): Trigger a200Ws–600Wsstrobe (Godox AD200 Pro,AD300 Pro,AD400 Pro, orProfoto B10) bounced straight into a neutral white ceiling slightly behind the camera so5500Klight fills the room evenly without casting forward lens shadows. - Capture the Darken-Mode Window Pop (Facing Bright Exterior Windows): Raise shutter speed to your camera’s flash sync limit (
1/200sor1/250s) to expose for the outdoor sky, then angle a bare strobe head toward the interior window frames as shown in our window pull real estate photo editing guide. - Shoot a 2-Pop or 3-Pop Composite for Open-Concept Kitchens & Great Rooms: In deep kitchen-to-living spaces, walk into the left and right zones firing separate ceiling bounces while keeping your body clear of overlapping furniture edges so editors can composite the frames cleanly.
Phase 2: PSVN’s 5-Step Photoshop Hand-Blending SOP ($1.20 USD / Photo)
When your RAW stacks (CR2, CR3, ARW, NEF, RAF, DNG) reach PSVN’s production desk, our dedicated pod editors and Senior QC Inspectors execute a five-stage manual Photoshop workflow:
- Adobe Camera Raw Geometry & Chromatic Sync: Optical lens profiles, purple/green fringing removal, and vertical perspective alignment (plumb wall verticals) are synced across every frame in the stack before opening as aligned Photoshop layers.
- Multi-Pop Flash Composite Assembly: For large multi-pop great rooms (Advance editing from $3.00 USD for complex multi-flash architectural composites, or included in $1.20 USD Standard for regular 1–2 pop rooms), editors mask out light stands and photographer silhouettes using soft gradient masks to build one clean
5500Kcolour base. - Luminosity Shadow Recovery (
45%–65%Opacity): The ambient exposure is placed above the flash layer inLuminosityblend mode and brushed in gradually (15%–30%flow), bringing back natural window light direction while preserving the flash layer’s true cabinet, wall, and hardwood colours (see our color cast removal & white balance guide). - Ceiling Desaturation & Hardwood Glare Repair: A targeted Hue/Saturation mask neutralizes warm chandelier bounce on white ceilings (
R=G=Bwithin±3points) while restoring natural wood grain where skylight glare hit polished floors. - 1px Pen-Tool + Darken Mode Window Pulls: Finally, the
-2 EVwindow-pop frame is clipped via hand-drawn vector paths andDarkenmode so outdoor pools, trees, and city skylines read naturally without dark HDR halos.
Troubleshooting Challenging Rooms: Coloured Ceilings, Vaulted Beams & Glass Showers
Standard ceiling-bounce Flambient needs small field adjustments in three common architectural layouts:
- Dark Timber or Tongue-and-Groove Ceilings: Bouncing a bare strobe into dark cedar or walnut planks tints the entire room orange. Attach a small white bounce card, shoot through a compact shoot-through umbrella aimed into the back corner behind the tripod, or include a neutral grey/white balance reference shot so our editors can calibrate exact Kelvin tint.
- Two-Storey Vaulted Great Rooms: High 20-foot ceilings swallow
200Wsspeedlights. Fire a400Ws–600Wsstrobe into the rear upper wall behind the camera to create a giant directional softbox, supplemented by a 3-bracket ambient burst for upper-rafter shadow detail. - Frameless Glass Showers & Primary Bathroom Mirrors: Shoot one clean off-axis flash plate from outside the doorway so our team can mask out tripod reflections and chrome specular hotspots cleanly.
Frequently Asked Questions
How much does outsourced Flambient photo editing cost compared to HDR at PSVN?
At PSVN, standard hand-blended Flambient and multi-bracket HDR share the exact same Standard studio rate of $1.20 USD (A$1.80 AUD · £0.95 GBP) per finished photo—meaning zero surcharge to upgrade from HDR to Flambient. Basic single-exposure editing starts from $0.60 USD (A$0.90 AUD · £0.50 GBP) per photo, AI Golden editing is $1.00 USD, Twilight colour-cast removal is $1.80 USD, and complex multi-flash Advance or Architectural composites run from $3.00 to $4.00 USD per photo, as detailed in our Flambient vs. HDR editing cost breakdown.
How many raw frames can I include in a Standard $1.20 Flambient stack?
Our Standard $1.20 USD (A$1.80 AUD · £0.95 GBP) tier covers standard residential Flambient stacks (ambient exposure/brackets + 1–2 interior flash bounces + 1 window pull pop) with zero hidden window-masking fees. Large commercial or luxury rooms requiring extensive 4–8+ flash-pop light-painting composites are handled under our Advance ($3.00 USD) or Architectural ($4.00 USD) tiers.
Should I place the Ambient layer in Luminosity mode over Flash, or Flash in Color mode over Ambient?
Both approaches combine ambient luminance with flash chrominance, but placing the Ambient layer in Luminosity mode above a properly exposed Flash base gives editors cleaner control over deep hallway shadow noise and specular highlight suppression on stainless-steel kitchen appliances.
How can I test PSVN’s Flambient blending workflow on my own RAW stacks for free?
Visit our Start Free Trial page and upload 3 RAW photo sets + 1 video clip (or up to 5 Flambient RAW stacks) at zero cost. Our 80+ editor team will hand-blend your files through our 2-Layer Quality Control workflow and deliver your finished gallery within 12–24 hours, plus include a 10% discount on your first month’s invoice.
Related Editorial Guides
View All Guides